Built-in Billy bookcases are certainly not a new concept, but I never felt like the directions were close enough to what I needed. Enter my friend Kate. She gave some more details about the project, and I knew I was sold.

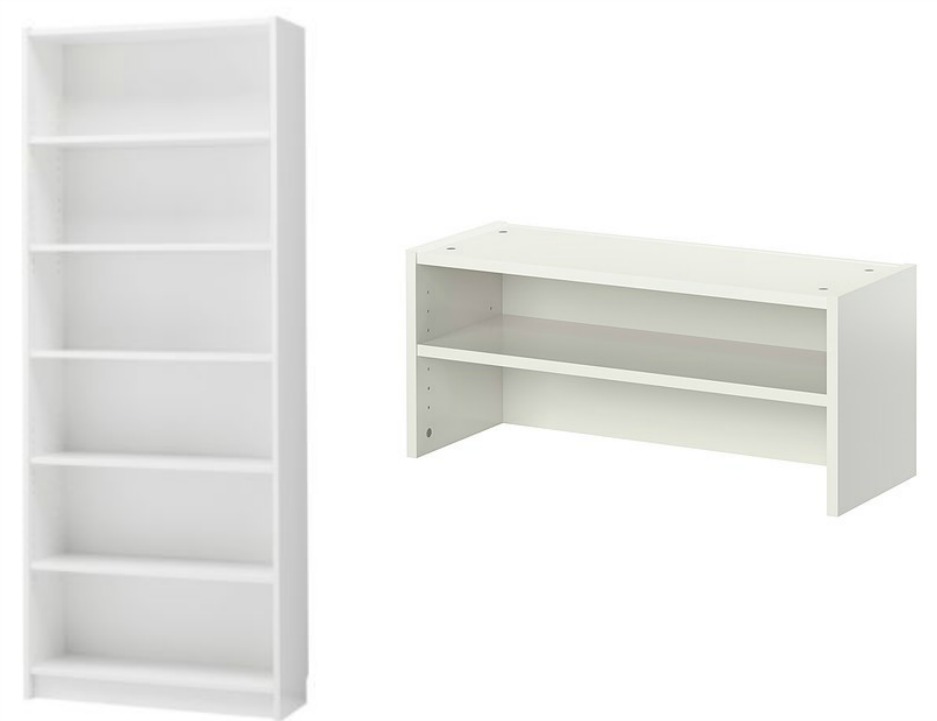
While I loved the 15” depth of Ikea’s newer bookcase, I knew I wanted them to go all the way to the ceiling. The extenders are only available on the 11” depth, so the decision was made for me. Whew! One less thing for me to ponder for hours.
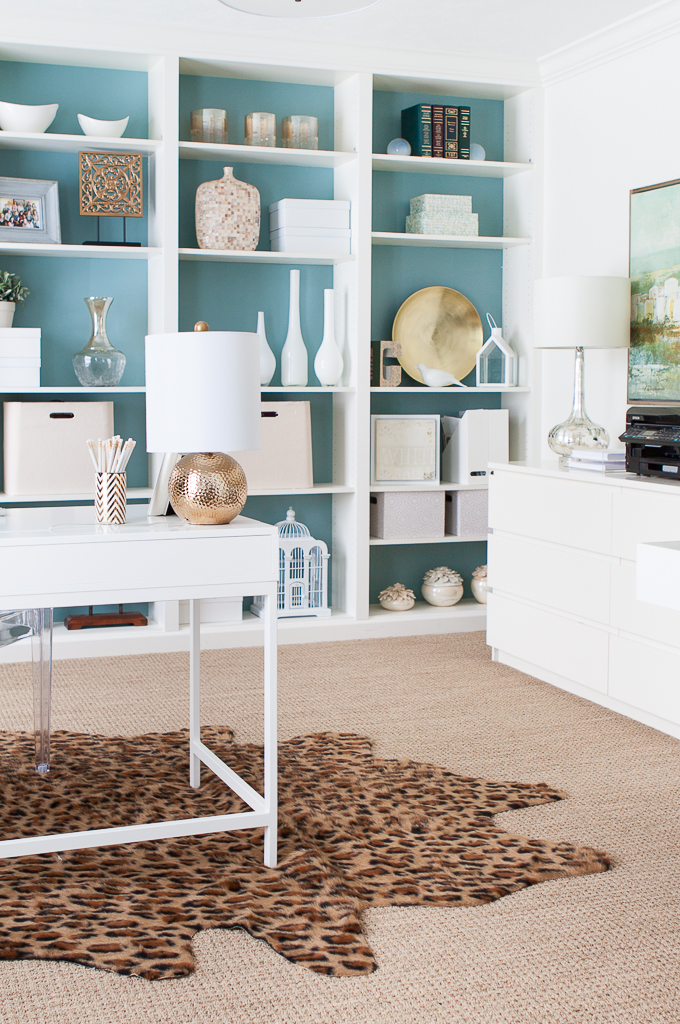
After measuring the width of my wall, I knew I needed 4 bookcases. Once they were built and I had painted the backs of them, they were ready to be installed. It took some tweaking, tugging, scooting, and LOTS of measuring, but they came to about 2 1/4” apart—including the space to the wall.

We found these strips at Lowe’s that would be the width we needed. Two problems—the grain in the wood (not my favorite) and they were pricey at $8.00 a piece. They had cheaper ones that were only 4 feet tall, but my husband argued that it would bother me having a seam half way up the bookcase. He was right, so we spent the money.

Once these were attached with small nails and my nail gun, it really made the piece come to life. We have built-ins!

We didn’t put any wood underneath the shelves, but we did attach the shelves to the back wall with L-brackets from the top. I couldn’t get a picture of it, but we just used the brackets that came with the bookcases. It is covered by crown molding, so no one even knows.

Speaking of crown molding, that went up next. I basically got lucky. Crown molding doesn’t measure easily, so I guessed. I ended up with 5 1/4” crown, and it fit like. a. glove. Whew!

That is where my luck ran out. Installing the crown molding? An absolute nightmare! Let’s just say the trim was too wide for my 10-inch miter saw, and every cut was nearly impossible to perfect. My FIL was such a trooper, and caulk has now become my best friend. It’s all good.

Finally, we installed the baseboard. We carefully ripped out the old baseboard (since we didn’t have a little Dremel) and cut them down to size. We then re-mitered as needed and installed back in place. That wasn’t too bad.

The finishing touches involved caulk and paint. There were some seams where the baseboard went into place, and I wanted to fill in some minimal seams along the sides. Again, caulk and I got to know each other very well.

Sorry about the night shot, but this shows the caulking. Once it was painted over, it was seamless. Nice.

A couple of weekends of building and some late night caulking and painting…and she was done. Well, almost. Filling up an 8×12 foot wall of accessories and storage pieces is no easy task. I’ll be back in a couple of days to show her off with all her jewelry on!

Cost breakdown:
- 4 Billy Bookshelves with 4 20” extenders= $280 ($300 with tax)
- Crown Molding= $15.00 (more if you want to do the whole room as we did)
- Quart of paint (Benjamin Moore Boca Raton Blue)= $13.00
- Trim pieces from Lowes 5x$8.00= $40
Total Cost= $368
**Update—If you’d like to see them all dressed up, here is the updated post. And if you’d like to see the whole office in its completion, you can click here! Whew!

Latest posts by Chris (see all)
- Tartan Plaid Bedroom - December 1, 2021
- Favorite Things 2021! - November 24, 2021
- Our Christmas Wishmas Tree - January 3, 2021


I love how this is coming together!! The color on the back of the shelves is just perfect! The wheels in my head are turning at the possibilities of where I could do this in my house. I’m thinking my office might be a good spot… 🙂
Exactly, Jenny! There has to be somewhere that you could use a whole wall of storage, right? 🙂
Wowza! They look terrific! I would love to have these in my home office. Thanks for sharing your tips and I can’t wait to see them all dressed up!
They look amazing – very built in! I so want to do this in my dining room, but for some reason I just can’t pull the trigger. Your post may just get me there. Thanks for sharing, liz
Very pretty! They look like they’ve been there all along. Anxious to see the accessories, I always need ideas for filling shelves. That’s kind-of tricky! I spied the new light, too. Perfect!
Love how they turned out!! Beautiful!
Thank you, lady!
Turned out awesome like they’ve always been there!
Lookin good! Can’t wait to see it all dressed up:)!
Totally amazing, I just love the look and function. Glad to see it went smoothly, I’m sure you are loving it in that space!
So smart!
I wish I’d known about that paint color last week before I had to choose on the spot at Ace for hte free quart. My garage stairs are now lime green. YOURS is the blue I wanted but I froze. Never ever choose paint colors on the spot.
Oh no, Kristin. If it makes you feel any better, I’ve been a victim of the same issue. What a waste of money, right? Who knows! Maybe you’ll get used to the lime green. 🙂
gorgeous! you had me at blue painted backs!
Love it, Antiquechase. Thank you!!
Gorgeous! I’ve been wanting to do this but, it seemed intimidating….Thanks for breaking it down for this DIY newbie 🙂
Can’t wait to see your finished wall. Lookin’ good!
BEAUTIFUL! Can you come to my house next? 😉
You bet, Rebekah! Just as soon as I recover from doing mine. 🙂
It looks SO great! And you can’t beat that price for built ins, especially ones you put up as quickly as you did! Our basement built ins that Dan made were about the same in cost but it took him a good 2 weeks of painting and sanding – it was hard work watching him and bringing him diet coke 😉
Love that you painted the backs too – now I am plotting on where I could do this in my house! I haven’t talked to you in awhile friend, hope you are doing great! We are off track and counting down the days till Disney! Whoo hoooo!
Oh gosh. I’m so sorry that you had to watch and bring Diet Coke. I know you must be exhausted. 🙂 Thank you! You’re right–we haven’t caught up in a while. My comment/reply thing doesn’t seem to be working. I’ll write through e-mail to see that you get your response? Hope you’re doing well! SO envious of Disney! Lucky duck!
Looks great! I love billy bookcases 🙂
I love what you did. I have been thinking of doing the exact same thing in my office with the Billy bookcases. Glad to see it can come out so great!
That looks awesome!!! Nicely done.
Kim
Wow!!! This is gorgeous!! Now to figure out where I could put something like this!! I have total blog envy- you have such gorgeous stuff! I see you’re going to Haven and I think that I am too!! I am a new blogger and trying to learn as much as possible! 🙂 Thanks for such great inspiration!
~Lindsey
I am, Lindsey! I’m one of the co-founders of Haven, so I’m really excited for it to finally come to fruition! I would love to meet you at Haven! Hopefully, you’ll be able to go! Let me know if you can!
pinned this gorgeous project!
Love the molding and the color of the back, looks great with the wall color, Kathysue
They look completely custom. Love the contrasting backs.
I see that as a high compliment from you, Sandra! You’re the genius builder! Thank you!
Wow…your shelves look amazing! Totally worth all of the effort. Cannot wait to see her accessorized.
That paint color is perfection…I need to grab a sample of that!
Thank you, Cindy! I do love it!
Love it!!! The colors are beautiful and I love the trim work-definitely worth the extra cash:) We are working on some built-ins and a window seat in our master bedroom and I will be heading out to stock up on knick knacks soon…can’t wait to see how you decorate yours!
Test
Answering comment.
Looking good!
It seems like there is always something we want to do.
Melinda
I never get tired of seeing these brilliant billy transformations. Unfortunately most of our walls have huge windows (what a problems huh), or have pitched ceilings, so built-ins (faux or real) are probably not in the design cards. Sad face.
Totally gorgeous Chris, I just love the color you chose for the back! How funny that our walls are almost exactly the same width. 🙂 Can’t wait to see them all styled with your pretty things!
xo
Kate
Thanks so much, friend! Your shelves made me take the leap, and I’m so thankful that you gave great instructions! Needless to say, we referred to them often. 😉
Wow! Never ever would’ve guessed that they’re not the real deal. Looks SO good!
They totally look like high end built-ins. Great job. Can’t wait to see them all decorated.
WOW, this is absolutely stunning!!!
I want to do this…..Thanks
They are gorgeous! Can’t wait to see them all styled!
OXXO
Kristin
Wow, love this! Can’t wait to see it all finished…..
You used the extenders? Are those used at the base or at the top?
Lovely…so adore the billy. Hehe, that sounds too funny saying it out loud. Seriously, beautiful.
🙂
shaunna
I love a wall of shelves…especially ones with color! Very nice project and I look forward to seeing the finished styled shelves. Fabulous!
I love it! They look fabulous and the blue on the back of the shelves is a great color. Enjoy!
I love the shelves! This is something I need to have in my office. And I can’t believe that the total cost of the project is only $368!! Amazing!
I know, right? Crazy results for a few hundred dollars. Thank you for stopping by, Julia!
Wow – it looks fantastic!!! Thanks so much for sharing your installation experience, I am sure I’ll be coming back to reference this when I install mine. Your built ins came out beautifully!!!!
What a great transformation. That picture in you craft room is one of my favourites too.
Hi, Chris
I love what you did with the bookcases. They turned out great. Thanks for sharing.
Vanessa
Thank you, Vanessa!
I would LOVE to have shelves like this in my home. Amazing!
lexmallabooks.com
This is just beautiful! I pinned them to my home office and craft room! Thanks so much for the tutorial for putting them together!!
Just gorgeous.
Boy this looks really good. Absolutely love the color backing the shelves and then the tan main walls. Matches your cherry branch painting perfectly. I love crown molding, don’t you. It’s like the finishing touch. You wouldn’t get a hair cut and not do finish cutting! Tell Jeff he did a great job. Now I can’t wait to see how you display your shelves! Love it all…. Mom
Chris, they look absolutely, positively beautiful. That gorgeous wall of shelves looks like more like it cost $3680 than $368. I love the way you made the shelves of the two inner units match and the shelves of the two outer units match. Very cool, a little unexpected, but still perfectly symmetrical. Gorgeous!
I have one question. Are the bookcases made of quality material? I’ve got a few from Target that are placed pretty close together in my library, but I’d never buy them for a project like this, since they’re made of particle board which is already bowing and warping. I love the look you achieved from your efforts, let me know how they wear with use!
Well, Mallory, they’re definitely not solid wood if that’s what you’re asking. They’re a particle board, but they down bow at all. I would definitely recommend them for a project like this. I hope that helps!
UNBELIEVABLE!! I’m looking around my house right now thinking “Where can I build one of those!!!” I love it!!
Jen
athomeinthenorthwestblog.com
Wow ! Great job.I love this.
Very clever. Love it!
What paint colour is the blue that you used? It’s absolutely perfect!
Boca Raton by Benjamin Moore! Thank you!
Chris,
What paint do you now use since the BM low lustre metal and wood paint is discontinued? (for that pottery barn effect)
Sherri
I love the built ins. In fact I just went to Cincinnati, OH (2 hour drive for me) and bought the 2 of the Billy bookcases after stalking your site a few weeks ago! A question I have..what color is the white to match the bookcases and the trim? I am going to be putting together my system hopefully this weekend. I love the blue also. Fantastic job!
Great job! You should be so proud of that bookshelf!!!
Hugs,
Bj
What a way to dress up boring Ikea bookshelves! They look amazing and I absolutely LOVE that color!! Job well done! 🙂
Thanks! This is just what we want to do in our family room! I’m pinning this!!!
Great job. CAULK is the most essential “tool” for me when working with with crown-molding/baseboards. It can be used to fix nearly any imperfection 🙂
If you hadn’t told us, I would have thought those bookshelves had been permanent fixtures. You are so talented!
just stumbled onto your blog and we love it! This is such a cost effective way to build a built in book case. Thank you so much for sharing this 🙂
Thanks for sharing! Quick question… When painting the trim, how did you match the exact white color and sheen of the finish of the bookcases? (or do Billy bookcases come unfinished?). Thanks!!!
These are absolutely stunning! I love the look of built-in bookshelves, but I’m much more the ‘assemble yourself’ kinda gal… love how you mixed the two worlds to get a totally awesome end result! I think my favorite part is the aqua backing… SO sweet! Thanks for sharing, and God Bless!
Looks fabulous. I’m curious if you covered over electrical outlets? I love the look, but I so hate to lose outlets. I never seem to have enough in the right spaces. I wouldn’t think it would be too hard to cut through the thin backs of an Ikea bookcase.
I love this! Two questions. First, how did you fill all the little holes on the insides of the Billy bookcases that are used to place the shelving? Caulking? Second, did you use a special type of paint to paint the back of the bookcases?
Thanks!
Amanda
As a fellow IKEA/Billy fan, I gotta tell ya — this is simply gorgeous! I’m really impressed with how finished it all looks. Well done!
One question, if you don’t mind: did you cut your carpet back to the edge of the bookcases or just place them on top of it? If the latter, have you made any provision for future carpet replacement?
We’ve done it both ways in our house and I have to say that cutting back the carpet wins out in my book.
Thanks!!
Peg
It looks like the painted trim/molding match the color of the cabinets in the photos. Did you just paint all trim a white which matches the Billy color, or did you prime/paint the actual cabinets and shelves? If the latter, could you describe the process and what sort of paints/primers you used? Thanks!
Awesome! Simply awesome. Great work! I did have a question. You gave the paint color of the blue background…but I like the color on your walls as well. Could you share that color?
These look amazing! I am actually getting ready to do the same thing in our house. Can you tell me what brand and color or the paint was that you used to paint the trim to match the shelves? I’m afraid a lot of whites won’t match.