You’re right. This is most certainly not the first time this has been tutorialized. But when I tried to find a tutorial on it, it was nearly impossible to find one that gave me the step-by-step that I was looking for!
 (I made this one to be “officially” announced on Friday.)
After figuring it out for myself (shocker), I’m passing that knowledge onto you. Keep in mind, I’m not a technical guru or a code phenom (I leave that up to Beth), but I think this works! Here we go.
First off, sign up with Picnik. It’s FREE (sort of), and it’s brilliant. The free version offers everything in this tutorial, but the selection of fonts, etc. is much more limited. The Premium version is only a couple of dollars a month. Totally worth it.
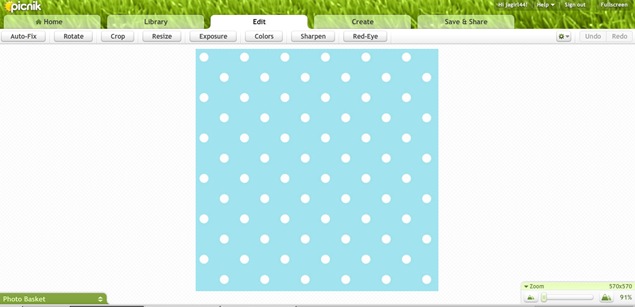
1. Okay. Find a background (all kinds of sites have free ones) that you can save to your computer. When you get onto Picnik, upload it. This is what you’ll get…
**I used screenshots for this tutorial, so I apologize if some details are difficult to see. I have written some extra info in red in order to clarify some things.**
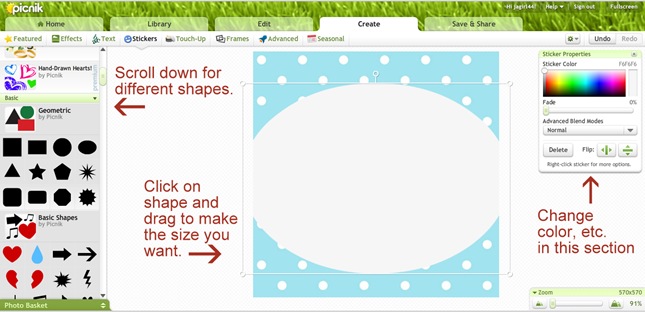
2. Click on the “create” tab, and it shows you numerous things you can do (ie. stickers, text, frames). I added a little oval sticker to put on the background and dragged it to the size I wanted.
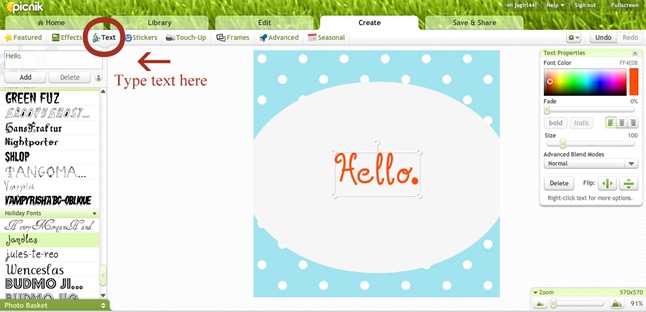
3. When you’re ready for text, just click on that tab and type in the text box. You have the freedom to change the font, color, size, etc. You can also drag it all over the place to position it just right.
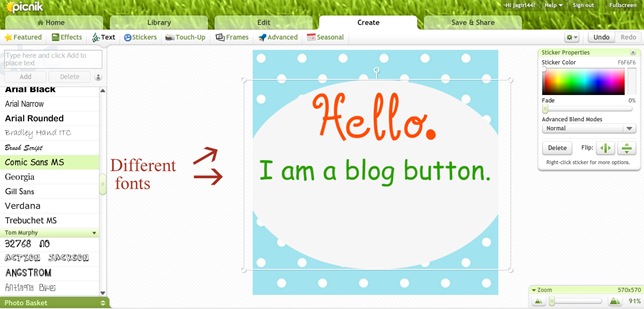
If you want to use different fonts, make sure you click in the text box again for a different one.
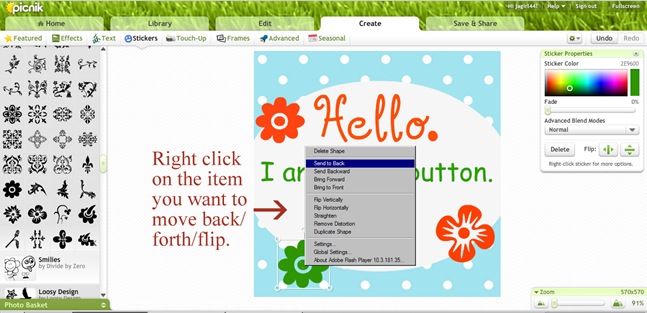
4. Add shapes/stickers. Go crazy here. Below, I’m showing that if you right click on the item, it will do more things as well. Most of the fun is just playing around with it!
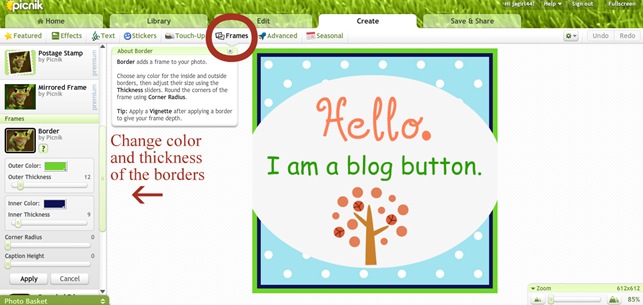
5. Frame it! All of these things are optional, of course, but I like it framed.
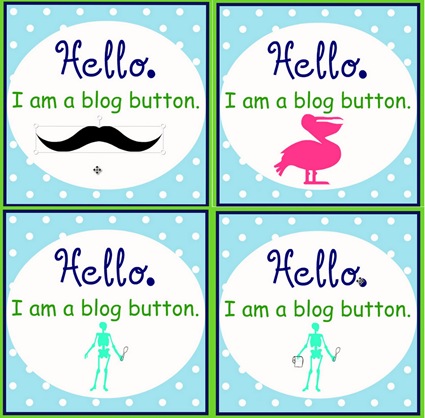
5a. Here are some examples of how you can add stickers/colors to change it up. I don’t know about the skeletons. It was late; I found him funny—especially when he was holding the toilet paper. Poor skeleton has tummy troubles.
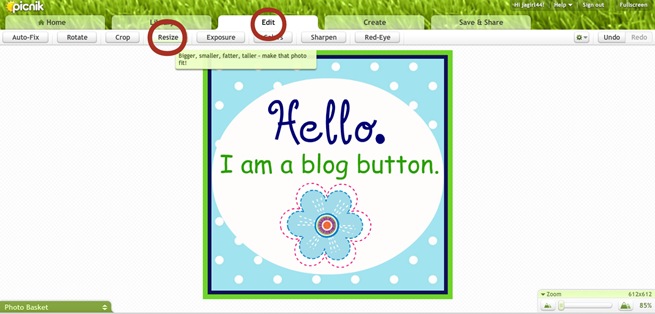
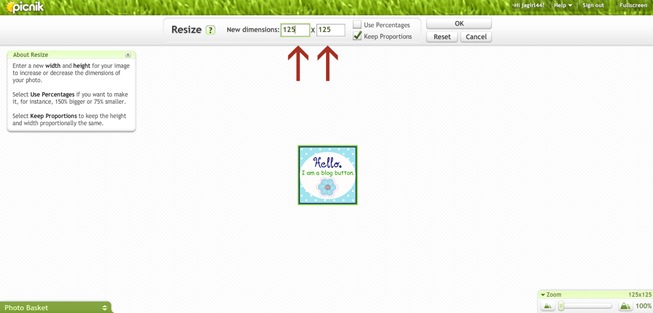
6. Once you get your button exactly how you want it, you’ll need to resize it. Standard button sizes are 125×125, but you can make it whatever you want. Click on the “edit” tab, then “resize” tab.
You can just enter the dimensions into the boxes, and it’ll resize it for you. As you can see, you’ll want to be aware of that when you’re adding text. You don’t want your text to be too small once it’s sized. (If this were a real button, I would have adjusted that.)
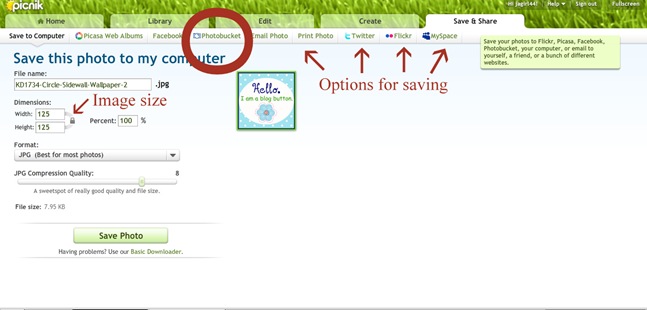
7. Finally? Save it! I LOVE that Picnik gives you the option to save it to multiple places. Twitter, Flickr, Photobucket..on and on. That’s cool.
In order to get it on your blog, you’ll need to do a few more steps. However, THAT tutorial can be found ev-er-y-where. Here are a few that I think are helpful.
Smile Monsters offers a good visual of what Photobucket looks like for your HTML code.
Home Stories A to Z offers a tutorial on how to make one with the code offered underneath.
The Blog Designer Network is another tutorial I like for both.




THANK YOU, Chris. I’m one of those people who needs detailed, step-by-step directions and photos to guide me. And then a little extra explanation on the side. With a few hints printed in red, just for good measure.
You know, you really should consider being a teacher. 🙂
Richella, that made me laugh! Thank you!
best tutorial i have ever seen THANK YOU! I’m posting this on my fb, I know everyone will love this!
XO
Kristin
Yes! I’m so glad. ALL of the tutorials I read said, “Use an editing program” I didn’t know what that meant! What if you don’t know how to use an editing program? Gah! Frustrating. Glad you like it.
Thank you for this! It’s like you read my mind re: “where can I find a straightforward tutorial?”
Well, the answer is… right HERE. 🙂
Thanks
Emily
I love it! I’m so glad! I couldn’t find a straightforward tutorial either! Frustrating!
Thank you!! I’ve wondered frequently how to do this. (Love the mustache button. Don’t know why you didn’t go with that one.)
Thank you!
Now I know what one of my weekend projects is going to be!
Hahaha… I love the skeleton even more after you comments on his tummy troubles 🙂 What a great tutorial… thanks!
Thank you from the bottom of my heart. Finally a tutorial about buttons that I can understand. I am so tech challenged, but this one I know I can do. Now I can have pretty buttons on my blog. I’m going to feature this on my Friday Favorites if you don’t mind. Thanks!
You bet I don’t mind! I wish I could have found a step-by-step tutorial. I hope people can use it!
this is amazing! thanks for showing i’m always using picnik! love it!!.. never thought of doing a blog button with it! yay! colorkrafts.blogspot.com
Thank you so much for this visual tutorial! I am a visual learner and this helped out so much as opposed to those other tutorials where they just tell you. I just made new buttons for my blog. 🙂
OMGoodness, I was just looking for this yesterday, I feel so stupid that I didn’t even know where to start! I can do this!!! Thank you so very much, great info!!!! Thank You Thank You Thank You
Yea Chris!! Thank you. Finally, a tutorial I can understand.
As soon as I saw the title of the post, I said thank you-out loud to my computer screen ( I mean to Chris!!!) Thank YOU!
What an awesome comment, Shawon! Love it! Thank YOU!
Thank you! Sometimes things like this are so frustrating to find and step by step instructions are always awesome! Amaing, thanks!
Thank you so much!!! You made this so easy to follow 🙂
http://kim-lifeasweknowit.blogspot.com/2011/08/blog-buttons.html
I made my blog a cute button 🙂
Thanks again
Brilliant! I really, really needed this! Thank you!
This is so awesome! I never knew how to do this myself before! I would love to have you come link this up at my weekend link party going on now! And I’d love to have you as a follower. If not, then you have a lovely weekend!
http://quiltedeuphoria.blogspot.com/2011/08/weekend-wow-me-party-2-giveaway.html
Thanks so much for this! You actually made it look understandable!
YES!! I’m SO glad you did this. I too had such a hard time with other blog button tutes out there! I made mine THIS way! Just the way you have described! OH and I made my blog header from Picnic too! LOVE picnic! 🙂
I need to make a button for my blog. Thanks for posting this. Maybe I’ll tackle it this weekend. I’ll let you know how I do.
Thanks again!
Thanks for the shout out love!
by far one of the best blog button tutorials I’ve seen on the internets.
thanks for sharing your mad skills.
🙂
Great tutorial Chris!! I LOVE Picnik and use it for all of my photo editing. I have never tried to make a button with it, but I’m so excited to try. You are so smart!!
xoxo
Jen
Thanks, Jen! Not necessarily smart…just desperate to make a button. 🙂 Amazing how desperation makes you find things out for yourself!
Thnks for the tutorial 🙂
great tutorial! thanks! I appreciate the additional links for getting the coding as well. 🙂
-h
This is THE tutorial I’ve been needing but unable to find. Thank you so much! What a HUGE help!
That is so awesome, Deanna! I’m so glad I could help you!! Thank you for telling me!
Just popping in to say that I finally used your tutorial. And…can I just say…way too much fun. Thanks for the new obsession! Here are some of my buttons:
http://www.love-life-project.com/2011/08/look-i-made-some-buttons.html
That’s so cool, Stephanie! I’m so glad you linked to it so I could see all your creations. Love them! Great job!
Hooray! This sounds awesome– I have been BEYOND frustrated by the tech-savvy tutorials that assume I know what a “Nava bar,” “Favicon,” and “Editing Program” are. Thanks so much. I’ll be trying this soon.
Ha! That’s exactly how I felt! So glad it helped you! Good luck!
Thank you, thank you!! 🙂 This helped tremendously!
Yay!!! Thank YOU for telling me that!
I know this isn’t a new post of yours, but wanted you to know that I have been looking everywhere for a tutorial like this! Thanks!! Now I hope I can find the detailed instructions on how to add it to my blog! Can you tell me how you got your pretty subscribe buttons on the top left of your blog?
Thank you, April. I’m afraid THAT is way over my head. I have a blog designer who did that for me. 🙂 My designer and my “techy” guy are in my advertising space to the left. Feel free to inquire with them! Good luck!
Thanks, Chris! I LOVE your blog!
Super Helpful! Thanks so much!
I just went to Picnik and they had a message that they are closing April 1 to move to Google+!!! However, it says you can access all the features including the premium ones you mention for free until then! I’m glad I found this just in time.
Thank you so much! I just made the cutest button ever in about 15 minutes Easy-Peasy!
You’re the best!
Oh, I’m so glad I could help you, Jenny! Thank you for telling me!
Thanks for this tutorial! It is so much easier to understand than others I’ve come across. I’ve been wanting to make a button for my color pages. Thanks! Thanks! Thanks!