Thank you for waiting for this post. I know some of you have been patiently waiting for the “JustaGirl” version of this. I will say that after searching every single board and batten project out there, everyone’s is slightly different. As a matter of fact, I don’t even know if mine constitutes as B&B. But—that’s what I’m calling it.

Perhaps the #1 question I’ve gotten is if I removed the original baseboard. Yes, I did. I stupidly didn’t go for it when we built, and it’s my goal to implement it throughout the house. I figured I might as well start now.

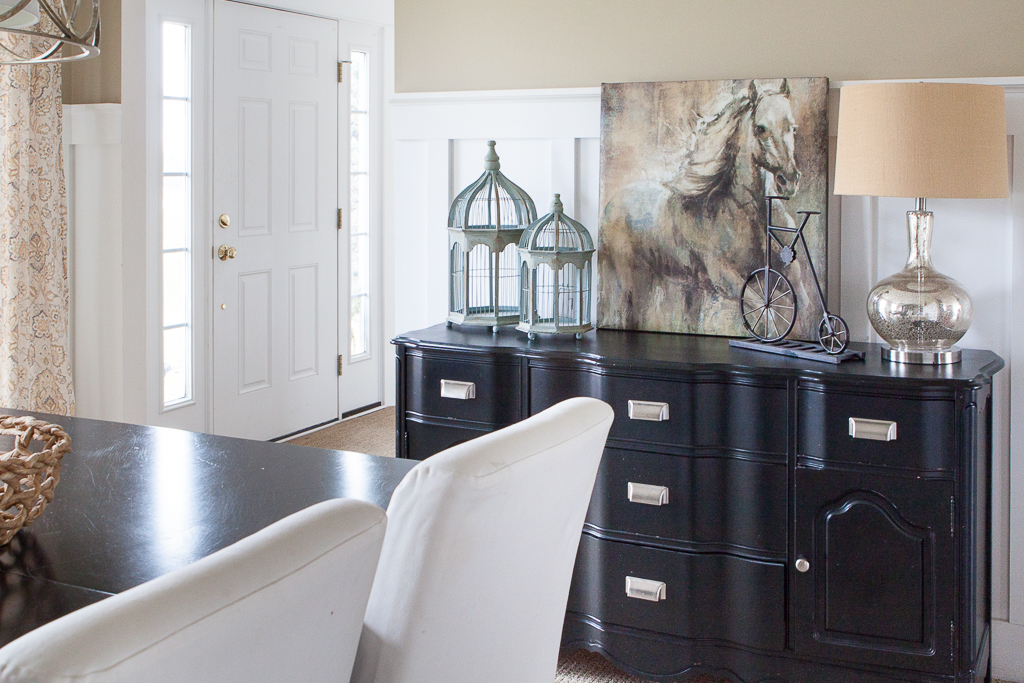
The B&B is entirely from a couple of sheets of MDF. I think they were @$25.00 a sheet. For those of you asking for measurements, they are as follows:
- Space between battens: 14 inches (this is not perfect in all areas. We adjusted at corners, some outlets, etc. We got lucky, though, and didn’t have to do that more than twice.)
- Batten width: 3 inches (kind of wide for batten, which is why I question the term)
- Baseboard height: 6 inches
- Topboard height: 5 inches (I didn’t want them to be the same because I feared it would look too heavy on top since I still had the shelf of wood to place over the topboard.)
- Shelf depth: 2 inches

To attach it to the wall, we used a nailgun. The trim being held on by blue tape is just “Liquid Nail-ed” on there. The nails were too long for the quarter round, and it was light enough to be held by the glue.

A detail shot so you can see what I mean.

Below is the first color I painted it. I LOVE the color, but it didn’t show off the new trim enough for me. Darn. I had to repaint the top.

Some tidbits I wish I would have known first–
- Prime and paint the bottom half of the wall (and the mdf boards) before you install! It would have saved me HOURS of paint time had I done it first.
- Use a good, white gloss paint. Don’t be cheap like me and and end up spending more money that you should have because you started with cheap white paint!
- Paintable caulk will become your BEST friend. Granted, I was picky. I wanted it to look just a certain way (no gaps, etc.). You may not have to sand as much or fill as much as I did if you’re less worried about it.

There you go! Hopefully, it answered the questions you have. Next up? The fun stuff! I’ll share colors, purchases, etc. in part 2.
If you need more info, feel free to Facebook! I’m hoping it will help with communication!


Latest posts by Chris (see all)
- Tartan Plaid Bedroom - December 1, 2021
- Favorite Things 2021! - November 24, 2021
- Our Christmas Wishmas Tree - January 3, 2021


Looks very nice! I am so tempted to do this in every room of my home, hahah. Now to pick the first one and jump in.
You are such a rockstar, Chris. I love it!
That's beautiful
It looks awesome! It gives a lot of depth to the room. Kudos to you for tackling a project like that.
LOVE it! It looks fabulous!
It looks great. My question is how were you able to paint the baseboard once it was up without getting any paint on your carpet?
Thanks for that tutorial. You made it look easier. I think maybe I could do that. I really want to do it in my laundry area.
Looks great.
Brooke
Very cool! Our version of board and batten is very similar to yours. My hubby used scrap wood when we were building out house to do B & B in our dining room.
It really looks great – can you tell me how tall it is?
Looks wonderful! This is on my to-do list for our guest bedroom and guest bath. Just not sure how I want to do it yet.
Looks really nice!! Looks awesome!! I am definitally coming back to this post for future reference when I redecorate our new home. I absolutely love it with the paint color that you have on the wall already. Do you mind if I ask what that green is called? It looks like a Tiffany color to me, but there are so many variations and so many "names" to colors is like running in circles to try and find a specific color you know exhists!
I am so glad you re-did the baseboard , I think it is a bad idea to leave exsisting base when you do this treatment , this is a go all the way treatment .
Chris
That looks great. I just had the same thing to my treehouse turned pool house thing-a-ma-bob house. I'll be posting later this week about it.
I'm trying to convince hubby to have this done in the house…he is not so excited about it as I am. He thinks it will over-price our home since we aren't planning on living there forever 🙁 Maybe someday in our forever home.
Chris, it looks wonderful! I'm thinking about taking this on in my upstairs hallway.
Love it!
🙂 Laura
LOVE.
Such a great project with wonderful results! I love MDF, it is so easy to cut and smooth. Your dinning room is just beautiful!
Gorgeous!
Lisa
It's beautiful! I would love love to do this to my dining room… now I just have to get the hubs on board…
LOVE it! I would love to do this in our dining room. One question. Did your walls have a lot of texture? Mine do and so I am not sure how this would work for me.
Truly Fabulous.
Your dining room looks so beautiful! I just sent a copy of your post to my husband and told him, "I want this!" One question: how did you transition from the new b&b baseboard to the old baseboard in the next room? Thank you, thank you, thank you!!
Melissa
Looks Awesome!!
I really want to do that to our dining room, still trying to convince the husband…
Thanks for the info, it looks great! I'm definately doing this in our future home that we're trying to buy right now.
I did this to my master bedroom last July. Yours looks fabulous. I love the widths you choose. I learned the hardway too about not painting everything before installing. My knees were aching.
http://culdesacchic.blogspot.com/2009/06/master-bedroom-makeover.html
AMAZING! This is great it looks beautiful! I really want to do this now!
What a great tutorial! Your walls look fabulous!
Stunning, Stunning, Stunning!!
Lou Cinda 🙂
Looks gorgeous!!!
Looks great!!
Melissa 😉
I love it! We are planning to do some in my living room and little boys room… I think your way might be cheaper than buying the pre-cut pieces I was planning on, so thanks for showing me there is another way!! I love the paint color too!
hi Chris-
I think I have looked at all the
B&B projects also. I think yours looks how I would want mine to look – chunky and thick. The upclose shot of the top really helped me invision how to install that part of the whole treatment. Thanks for including it in your post. I would love to do this in my foyer. Hopefully sooner than later.
My best- Diane
Wow, gorgeous!!!!
Looks absolutely stunning!
it looks wonderful! i am loving all the B&B posts lately – i am really starting to get inspired to do it in my own home somewhere!
Love it! We just finished our version of board and batten at my son and DIL's home.
I'm LOVING this!! I think we're going to tackle b&b at some point…I'm bookmarking this tute for SURE!! And thanks for the sweet comments about my blog! (and I hope it was alright to use your pics for your 'first aid' kits – I was quite the blog newbie when I posted that!!)
LOVE IT!!!!!
Melinda
Well, I am definitely going to bookmark this post. Your board and batten turned out fabulous. It is lovely. It makes me want to turn my home upside-down and do it all!
I love this look! Thinking it would look great in my downstairs but I'm curious about one thing. It looks like you just add the trim and mdf. Do you just paint the lower half of the wall the same color? How does it work if there's texture? I can't tell if your walls have much texture. :-S
Love it, but how tall is it? 🙂
This looks WONDERFUL!! I LOVE IKEA!! 🙂
This really came out very nice.
Web hosting is a server in regard to serving and maintaining files looking for one or more network sites.
A web hosting mending is a type of Internet hosting service that intention commandeer an special, province, school, administration league and more vicinity their website on the World Wide Web.
[url=http://www.jkahosting.com]Web hosting [/url] companies present space on a server someone is concerned use around their clients as well as the internet accessibility required to perplex on the web.
Monotonous more powerful than the computer lacuna is a sound situation in return the files and a fast bearing to the Internet.
There are innumerable different types of spider's web hosts, exercise power panels, operating systems, and options.
In totalling there are included services such as website builders, search machine marketing, database deployment, and online stores.
So how do you grasp what to employ and who to take it from?
Since they are so many options this can be confusing.
The first thing you want to settle is if you hope for a Windows web tummler or a linux spider's web host.
Much of the old hat it does not matter though if you eat unambiguous software to utility such as a shopping cart or database relevance this will be important.
It is best to discover out cold from your software provider the requirements of the program.
Then you devise need to come to a decision on if you need a province name and the amount of leeway and bandwidth needed.
Profuse trap hosting companies in actuality give away province names to new customers so this may staff sway your business.
In beyond uncountable web hosts also give a prodigious amount of blank and bandwidth in their hosting plans hoping you desire not truly needfulness it.
So now that you possess firm on the operating methodology and how much you need instant fail us look at the options.
A very habitual selection is the abhor of a unshackled website builder. This can be grave if you have no or teeny savvy with html programming. If you demand some meet with and scorn a database you make then distress to decide how assorted databases you require. Some hosts will exchange you endless databases and some price per database. There are also many other freebies nearby such as spontaneous handwriting (software) ordination, shopping carts, templates, search motor optimization assistance, unlimited province hosting and much more. Spam interdicting is also an substantial be involved you should calculate from your host.
Second that you be dressed set the options you are looking seeking it is mores to look as regards a host.
Wow! There are so many. A elementary search for the term network manager will create thousands of results. So who do you choose?
A trap innkeeper should in perpetuity be handy in case you have occasion for assistance. At the least they should receive a expropriate desk and faq quarter in example in any event you have questions. If feasible a phone number is also helpful. They should also accommodate a abstention server so your website is instantly prominent and not stupid to view. In addition they should provide no or uncommonly bantam downtime. This is when your website is not observable at all. When all is said your files should be in a fixed environment. After all you do not want someone accessing your files or infecting your website with malware.
To conclude they are tons trap hosting options and hosts. It is momentous to do your homework to put one's finger on the tucker a given with a view your website.
Very impressive, thanx for sharing!
Wow, thanks for all those details. What is the total height of the B&B?
Thanks.
Hi there I put this thread here to make to you all a way to make money 0nline free!
Get paid to click!!
Just go trought the links down and start winnig cash today on http://www.ptcsense.com/index.php?ref=reidopoker !
stay well
You did a beautiful job with the B&B. Question for you, what is brand/model of air compressor in the pictures?
I really loved it! I am planning to do some in my living room and bedroom room… I think your way might cost me lesser than buying the pre-cut pieces I was planning on, so thanks for showing me there is another way!!The paint color's are too good, i liked them too.
This is really beautiful! I’m so anxious to do mine, now!
What type of saw did you use to turn a full sheet of mdf into 3″ strips?
I love it by the way, so classy!
We had Lowes cut a large sheet to the length we needed, and then we used a table saw and a lot of hands to keep it as straight as possible as we cut. The table saw was just a small one my father-in-law had, but it worked! Thank you!
Yours is the best B&B tutorial I’ve seen yet. I just bought a house and will definitely be doing this in a few key rooms. Thank you for sharing.
Love the work you’ve done here! This would be perfect for our upstairs hallway! Thanks for the tips!
How many sheets of MDF did it take for this room?
I believe we bought three 4×8 sheets, and we didn’t use all of it.
How high up your wall did you go? I love it and we started the project last night but we are not sure how high to go up the wall.
You did a great job. It looks amazing! My hubby and I want to do this up our stairway, but wondering how high to go for that. I don’t think it would look good as high as yours b/c it’s a stairway and we don’t have a large staircase. How high do you think we should go for up the stairway and should we do maybe 2″ boards (although I love the chunky look)???
Getting ready to do this to our dining room and was wondering how you worked around the window ~~ can you post a picture so i can show my husband what we need to do. Thanks for sharing..
It looks fantastic! We have been wanting to do that in our dining room also. How far up the wall did you go?? We have a counter height table and chairs and need it to be higher than a normal chair rail. Also, WHERE did you get your dining room cabinet?!?!?!? I have a smaller version similar to that cabinet with the sliding glass doors, but I “NEED” a big one and I love yours!! Great job on the wall, I will be using your tips, Thank You!
Hi Jennifer! We went up about 60 inches. The cabinet is from a local furniture store (Art Van). We’ve had it a couple of years, but we still love it! Good luck!
You went up 60″ (5ft.)?
THANKS so much for sharing! We actually did b&B in our kitchen/dining/entry way after seeing your blog post! It has totally changed the feel and look of our entire house! Your time posting is very appreciated!
Jessica
ok!! Why do you have to be so fabulous!!!! I now an turning my house around wanting to make it look just like yours!!! I love everything about it!! Doing my B&B this weekend!!
Could this possibly be the best comment EVER? I think so! Thank you, Laura! Good luck with the B&B! It’s such an immediate transformation! I know it’ll be beautiful!
I didn’t even know I wanted to do this in my house until I happened across your blog. Can’t wait to do it! Guest bedroom here I come! Thank you so much! Great tutorial.
Beautiful! I noticed your walls are smooth (skim coated). I want to do this but I’ll need to skim coat the walls first to get rid of my “orange peel” texture. Thank you for the pictorial…very helpful :o)
Looks GREAT! I see you have windows, can you load a picture of how you worked around the windows? Thanks!
Great job! If there wasn’t a stud in the place you required, what did you nail into?
Thank you, thank you, thank you for the detailed instructions. Gonna do it before the holidays!!
Can you email me a picture of the corners. I want to see how the base boards and top boards with shelf line up and how you had them cut. Looks great and excited to start. Thanks
I’ve done this to 2 bathrooms & used 1/4″ luan underlayment, the cheapest maerial available, but more stable in wet areas than MDF. Had Lowes cut it into 2″ strips. It caulks & paints easily. Looks great!
Was wondering how far the shelf is from the floor? what length should the 3inch battens be?
Thanks!
Hi there, I’m getting ready to do this in my downstairs bathroom, it’s a small half bath and I’m wondering if you would reccomend spacing less than 14 inches given the smaller dimensions. awesome tutorial, was nervous about taking on this project up until now, best explanation I’ve found!
Hi. I love this. do you remember the thickness of your MDF? 1/2 or 3/4 inch thickness?
I love the board and batten project. I would like to know how thick the MDF sheet is that you used. I am getting ready to do my dining area wall this weekend!
Thanks, Ceri
Ok, so I guess I wasn’t clear on what I meant…is the MDF sheet 1/2-inch, 11/16-inch etc thick?
Ceri
I love the room!!! I’m in the process of figuring out the measurements of our master. I am so glad I saw this pinned. My life just got alot easier.
What did you end up doing under the window? Did you put the panels under the windowsill? If so how did you decide to space them?
How did you remove your old baseboards without destroying your walls? We have similar wainscoting in our downstairs to what you did and I am thinking about continuing it throughout the upstairs, but that would involve removing a lot of baseboards!
We did this treatment to our guest room in our house in Virginia. I hear you on the caulking, I swear I had bought a case of the stuff before we were done with the house! I had no fingerprints left on my finger tips! LOL But the end result is amazing.
We painted the bottom 2/3 part where the board and batten were in a semi gloss and the same color as the trim, this way, it looked as if the ‘blank spaces showing the wall’ were also wood. This only works if you have flat walls (not textured plaster).
Great job!